Easy Chocolate Acorns for Fall Fun
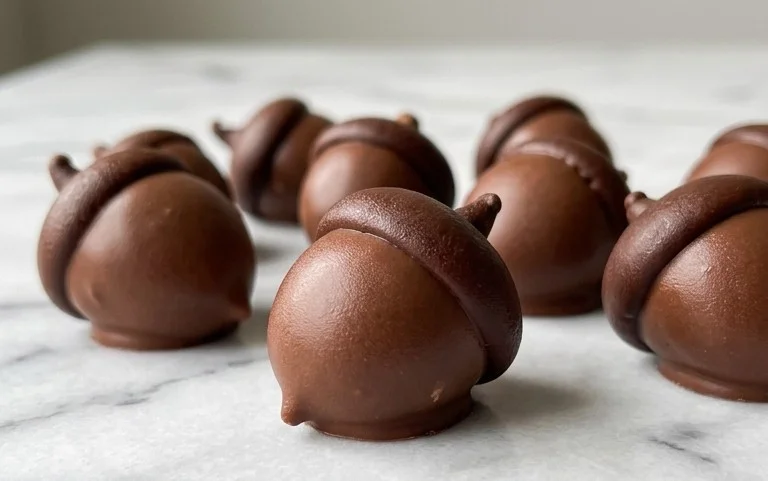
Chocolate Acorns are more than just a sweet treat; they’re a miniature marvel of edible art, perfect for ushering in the cozy vibes of autumn or simply satisfying a deep-seated craving for something utterly delightful. Imagine tiny, perfect acorns, crafted from rich, decadent chocolate, their nutty caps hinting at a burst of flavor within. What’s not to love about these delightful confections? They capture the essence of the season, transforming simple ingredients into something truly magical. People adore Chocolate Acorns because they evoke a sense of whimsical nostalgia, reminiscent of woodland adventures and the simple joys of nature. Their charm lies in their deceptive simplicity; they look incredibly sophisticated, yet they’re surprisingly easy to create, making them ideal for both seasoned bakers and enthusiastic beginners. These Chocolate Acorns are special because they offer a concentrated dose of happiness, a perfect bite-sized indulgence that never fails to impress, whether served at a festive gathering or enjoyed as a personal moment of pure bliss.
Chocolate Acorns
Get ready to bring a touch of autumn magic to your kitchen with these delightful Chocolate Acorns! These charming treats are surprisingly simple to make and are perfect for fall gatherings, classroom parties, or just a fun afternoon baking project with the kids. They look adorable, taste incredible, and are sure to be a hit with everyone who tries them.
These little edible treasures are designed to resemble the humble acorn, complete with a chocolatey cap and a sweet wafer base. We’ll be using some readily available ingredients to create this whimsical confection. Don’t worry if you’re new to candy making; this recipe is very forgiving and the results are always rewarding. Let’s gather our supplies and get started on these festive delights!
Ingredients:
- 12 ounce bag chocolate candy melts (your favorite color, milk chocolate or dark are great!)
- 50 milk chocolate Hershey’s Kisses (unwrapped)
- 50 mini Nilla wafer cookies ((see note))
- 50 mini chocolate chips
Note on Mini Nilla Wafers:
If you can’t find mini Nilla wafers, don’t fret! You can also use other small, round, or slightly oval cookies. Some good alternatives include mini vanilla sandwich cookies, or even small shortbread cookies. The key is to find something that provides a sturdy base and a complementary flavor to the chocolate. You want them to be roughly the same size as the bottom of a Hershey’s Kiss.
Crafting Your Chocolate Acorns: Step-by-Step
Now that you have all your ingredients ready, it’s time to assemble these adorable acorns. We’ll be working in stages to ensure each component is perfectly prepared.
Step 1: Melting the Chocolate for the Caps
The first step is to melt your chocolate candy melts. You have a couple of options here, but my preferred method is using the microwave. Place the entire bag of chocolate candy melts into a microwave-safe bowl. Heat them on 50% power for 30-second intervals, stirring well after each interval. It’s crucial to stir thoroughly between each heating burst, as this helps to distribute the heat evenly and prevents the chocolate from scorching. Keep going until the candy melts are completely smooth and pourable. Alternatively, you can use a double boiler for a more controlled melt, ensuring you don’t overheat the chocolate. Once melted and smooth, set aside.
Step 2: Preparing the Acorn “Tops”
Now, let’s get the Hershey’s Kisses ready to become our acorn caps. Gently unwrap all 50 of your milk chocolate Hershey’s Kisses. You’ll notice that each Kiss has a slightly pointed tip and a flatter base. For our acorns, the flatter base will be attached to the wafer, and the pointed tip will naturally form the top of our “acorn.” Place these unwrapped Kisses on a parchment-lined baking sheet or wax paper, with the pointed side facing upwards. This makes them ready for dipping.
Step 3: Assembling the Acorn Bases
This is where the mini Nilla wafers come in. You’ll be using these as the foundation of your acorns. Take one mini Nilla wafer and place it flat side down on your parchment-lined baking sheet. We want to create a secure base for our chocolate acorn. You’ll be attaching the Hershey’s Kiss to this wafer in the next step, so ensure you have a good surface to work on. It’s helpful to have all 50 wafers laid out before you start dipping.
Step 4: Attaching the Acorn Caps
This is the fun part! Using a spoon or a small offset spatula, carefully dip the flat, wider end of each unwrapped Hershey’s Kiss into the melted chocolate candy melts. You want to get a good coating, ensuring there are no bare spots, but you don’t want an excessive amount that will drip everywhere. Once coated, gently place the dipped Hershey’s Kiss onto the center of a mini Nilla wafer. The pointed tip of the Kiss should be pointing upwards, forming the “cap” of your acorn. Press down gently to help the chocolate adhere to the wafer. Work quickly but carefully, as the melted chocolate will start to set. If your chocolate starts to thicken too much, you can gently reheat it in the microwave for a few seconds.
Step 5: Adding the Acorn “Stem” and Finishing Touches
To complete the acorn look, we need a tiny stem. Take a mini chocolate chip and gently press its pointed end into the very tip of the dipped Hershey’s Kiss, which is now the “cap” of your acorn. The chocolate melt should still be soft enough to hold the mini chocolate chip in place. This tiny chocolate chip adds a realistic touch to your edible acorns. Repeat this for all 50 acorns.
Step 6: Letting Them Set
Once all your acorns are assembled with their chocolate caps and mini chocolate chip stems, it’s time to let them set. Leave them on the parchment-lined baking sheet at room temperature until the chocolate is completely hardened. This usually takes about 30 minutes to an hour, depending on the temperature of your kitchen. For a quicker set, you can place the baking sheet in the refrigerator for about 10-15 minutes. Be careful not to leave them in the fridge for too long, as condensation can form on the chocolate. Once firm, your Chocolate Acorns are ready to be admired and enjoyed! You can store them in an airtight container at room temperature for up to a week.

Conclusion:
There you have it! These delightful Chocolate Acorns are more than just a treat; they’re a tiny taste of autumn magic, perfect for any occasion. Their charming appearance makes them a showstopper on any dessert table, and the rich chocolate flavor is universally loved. I find them incredibly satisfying to make, especially seeing the smiles they bring when shared. Whether you’re hosting a fall gathering, looking for a fun activity with kids, or simply craving something sweet and whimsical, this recipe is a winner. Don’t be afraid to get creative with your toppings – experiment with different nuts, sprinkles, or even a drizzle of white chocolate for added flair. I truly encourage you to give these Chocolate Acorns a try; you won’t regret adding this sweet, festive delight to your repertoire!
Frequently Asked Questions:
Can I make these ahead of time?
Absolutely! Chocolate Acorns can be made up to 2-3 days in advance and stored in an airtight container at room temperature. This makes them perfect for party prep!
What other nut options can I use besides pecans for the caps?
While pecans create a classic acorn look, feel free to experiment! Almonds, hazelnuts, or even chocolate chips pressed into the chocolate could offer a fun variation. Just ensure they are roughly the same size and shape for the best visual appeal.
Chocolate Acorns
A delightful no-bake treat shaped like acorns, perfect for fall or any chocolate lover’s celebration.
Ingredients
-
12 ounce bag chocolate candy melts
-
50 milk chocolate Hershey’s kisses (unwrapped)
-
50 mini Nilla wafer cookies
-
50 mini chocolate chips
-
1 tablespoon vegetable oil (optional, for smoother melting)
Instructions
-
Step 1
Line a baking sheet with parchment paper. -
Step 2
Melt the chocolate candy melts according to package directions. If using, stir in the vegetable oil for a smoother consistency. -
Step 3
Dip the flat side of each mini Nilla wafer cookie halfway into the melted chocolate. Place on the prepared baking sheet, chocolate-dipped side up. -
Step 4
While the chocolate on the wafers is still wet, gently press one unwrapped Hershey’s kiss into the center of the chocolate on each wafer to create the acorn’s base. Use a toothpick to help position if needed. -
Step 5
Using a toothpick or a small dab of melted chocolate, attach one mini chocolate chip to the pointed end of the Hershey’s kiss to represent the acorn’s cap. -
Step 6
Allow the chocolate to set completely at room temperature or in the refrigerator for about 10-15 minutes.
Important Information
Nutrition Facts (Per Serving)
It is important to consider this information as approximate and not to use it as definitive health advice.
Allergy Information
Please check ingredients for potential allergens and consult a health professional if in doubt.