Easy S’more Bars – Your Favorite Campfire Treat Simplified
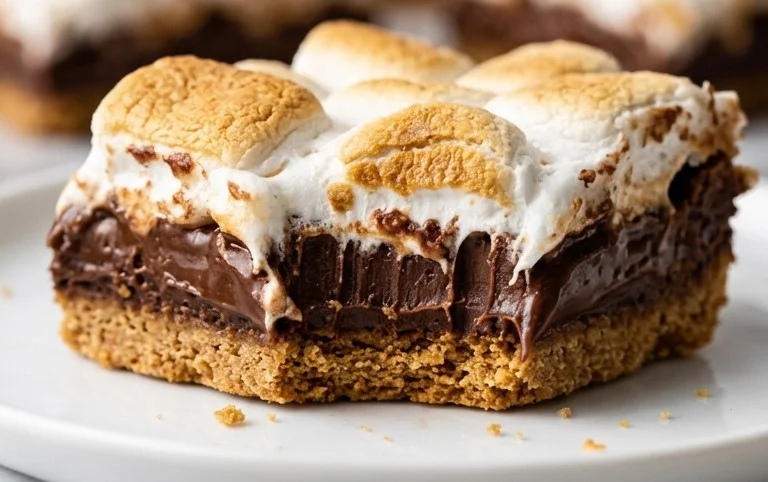
S’more bars are the answer to your deepest, most nostalgic dessert cravings. Forget the campfire struggle and the melted marshmallow mess; these S’more bars capture all the beloved flavors of the classic treat in a convenient, crowd-pleasing format. Why do we adore s’mores so much? It’s that perfect symphony of textures and tastes: the rich, melty chocolate, the gooey, toasted marshmallow, and the buttery graham cracker crust. It’s pure childhood joy in every bite. What makes our S’more bars truly special is that they deliver that same incredible flavor experience without the fuss. Imagine a decadent layer of buttery graham cracker, followed by a generous scattering of smooth chocolate chips, all crowned with a pillowy, golden-brown marshmallow topping that’s been perfectly toasted. These S’more bars are guaranteed to be a hit at any gathering, from backyard BBQs to cozy nights in. Prepare for rave reviews!

S’more Bars: Your New Favorite Indulgence
Let’s be honest, who doesn’t love a s’more? The gooey marshmallow, the melty chocolate, the satisfying crunch of graham crackers – it’s a classic for a reason. But sometimes, wrestling with campfire flames and sticky fingers isn’t ideal. That’s where these S’more Bars come in. They capture all the beloved flavors of a traditional s’more but in a convenient, bakeable bar form. Perfect for parties, picnics, or just a weeknight treat, these bars are surprisingly easy to make and ridiculously delicious. Get ready to impress yourself and everyone you share them with!
Ingredients:
- 2 cups Graham cracker crumbs
- 1/2 cup Melted butter
- 4 cups Chocolate chips
- 1 package Mini marshmallows
Instructions:
-
Prepare the Graham Cracker Crust
The foundation of any great bar is a sturdy and flavorful base, and for our S’more Bars, that means a perfectly pressed graham cracker crust. In a medium-sized bowl, combine your 2 cups of graham cracker crumbs with the 1/2 cup of melted butter. I find it’s easiest to melt the butter in the microwave in 30-second increments until it’s fully liquid. Once the butter is melted, pour it over the graham cracker crumbs. Mix them together thoroughly with a fork or your hands until all the crumbs are evenly moistened by the butter. It should resemble wet sand. This ensures the crust will hold together beautifully when baked.
Next, take a 9×13 inch baking pan and line it with parchment paper, leaving an overhang on the sides. This parchment paper is your best friend when it comes to easy removal of the finished bars. It prevents sticking and makes lifting the entire slab out of the pan a breeze. Pour the graham cracker crumb mixture into the prepared baking pan. Use the bottom of a glass or your hands to press the crumbs down firmly and evenly across the entire bottom of the pan. A tightly packed crust will prevent your bars from crumbling too much later. Preheat your oven to 350 degrees Fahrenheit (175 degrees Celsius) while you prepare the next layer.
-
Layer on the Chocolatey Goodness
Now for the chocolate! This is where the magic starts to truly happen. You’ll need your 4 cups of chocolate chips. While you can use any kind of chocolate chip you prefer – semi-sweet, milk chocolate, or even dark chocolate for a more sophisticated flavor – I find a good quality semi-sweet or milk chocolate strikes the perfect balance of sweetness and richness. Evenly sprinkle the entire 4 cups of chocolate chips over the graham cracker crust. Don’t be shy here; we want a generous layer of chocolate that will melt into a decadent pool. Make sure the chips are distributed as evenly as possible, as this will help them melt uniformly and create a more cohesive chocolate layer.
-
Top with Marshmallow Clouds
This is the part that really screams “s’more!” Carefully take your 1 package of mini marshmallows and scatter them evenly over the layer of chocolate chips. Try to cover as much of the chocolate as possible with marshmallows. They might seem like a lot, but they will puff up and slightly melt during baking, creating that signature gooey marshmallow topping. Some people like to leave a few small gaps to let some of the chocolate peek through, which can be visually appealing. Don’t worry if the marshmallows aren’t perfectly placed; a little bit of imperfection adds to the charm of homemade treats.
-
Bake Until Golden and Gooey
Now, it’s time to bring it all together in the oven. Carefully place the baking pan into your preheated 350-degree Fahrenheit (175 degrees Celsius) oven. We’re going to bake these for about 12 to 15 minutes. The goal here is to achieve two things: melt the chocolate chips into a luscious, smooth layer and toast the marshmallows to a beautiful golden-brown color. Keep a close eye on the bars during this time, as ovens can vary. You’ll see the marshmallows start to puff up and turn golden. The chocolate should be noticeably melted and gooey. If you find the marshmallows are browning too quickly before the chocolate is fully melted, you can loosely tent the pan with aluminum foil for the last few minutes of baking.
-
Cool and Cut into S’more Perfection
This step is crucial for achieving clean cuts and perfect bars. Once the S’more Bars are out of the oven, they will be incredibly hot and gooey. Resist the urge to cut into them immediately! Let the pan cool on a wire rack for at least 30 minutes. This allows the melted chocolate and marshmallows to set up a bit, making them much easier to handle and slice. For even cleaner cuts, you can place the pan in the refrigerator for another 30 minutes to an hour after the initial cooling period.
Once cooled and slightly set, use the parchment paper overhang to carefully lift the entire slab out of the baking pan and onto a clean cutting board. Now, using a sharp knife, cut the slab into your desired bar size. For classic s’more bar portions, I usually aim for 12 to 16 bars. Clean your knife between cuts if needed to ensure neat edges. The result will be a delightful bar with a crunchy graham cracker base, a rich chocolate center, and a soft, gooey, toasted marshmallow topping. Enjoy every single bite!
Conclusion:
And there you have it – your ultimate guide to making these incredibly delicious S’more Bars! This recipe is an absolute winner because it takes all the beloved elements of a campfire classic – gooey marshmallows, melty chocolate, and a buttery graham cracker base – and transforms them into an easy-to-make, shareable treat that doesn’t require a bonfire. The convenience factor is a huge plus, making them perfect for any gathering or just a spontaneous craving. I love how versatile they are; they’re fantastic served slightly warm for that ultimate gooeyness, but they also hold up beautifully at room temperature, making them ideal for potlucks or picnics. Don’t hesitate to get creative with variations – adding a sprinkle of sea salt on top can really elevate the flavor, or maybe a swirl of peanut butter before baking for a nutty twist. I truly encourage you to give these S’more Bars a try. They are guaranteed to be a crowd-pleaser and are so satisfying to make and enjoy!
Frequently Asked Questions:
Can I make these S’more Bars ahead of time?
Absolutely! These S’more Bars are excellent for making ahead. You can bake them a day or two in advance and store them in an airtight container at room temperature. For the best texture, you might want to briefly warm them in a low oven or microwave before serving if you prefer that signature gooey, melty marshmallow experience.
What’s the best way to store leftover S’more Bars?
To keep your S’more Bars fresh, store them in an airtight container at room temperature. They should stay delicious for about 2-3 days. If your kitchen is particularly warm, you might consider refrigerating them to prevent the chocolate and marshmallows from becoming too soft, but remember to let them come to room temperature for a bit before indulging for optimal taste and texture.
Can I substitute the graham crackers?
Yes, you can definitely get creative with the base! While graham crackers are traditional and delicious, you could experiment with other cookie crumbs like shortbread or even crushed vanilla wafers for a different flavor profile. Just ensure your base is pressed firmly into the pan before adding the other layers.
S’more Bars
A delicious and easy dessert bar inspired by the classic campfire treat, perfect for any occasion.
Ingredients
-
2 cups Graham cracker crumbs
-
1/2 cup Melted butter
-
4 cups Chocolate chips
-
1 package Mini marshmallows
-
1/2 cup Powdered sugar
-
1/4 cup All-purpose flour
Instructions
-
Step 1
Preheat oven to 350 degrees F (175 degrees C). Line an 8×8 inch baking pan with parchment paper. -
Step 2
In a medium bowl, combine graham cracker crumbs and melted butter. Press evenly into the bottom of the prepared baking pan. -
Step 3
In a separate bowl, whisk together powdered sugar and all-purpose flour. -
Step 4
Sprinkle the flour and sugar mixture evenly over the graham cracker base. -
Step 5
Evenly scatter the chocolate chips over the flour and sugar layer. -
Step 6
Distribute the mini marshmallows over the chocolate chips. -
Step 7
Bake for 15-20 minutes, or until marshmallows are golden brown and marshmallows are puffed. -
Step 8
Let cool completely before cutting into bars.
Important Information
Nutrition Facts (Per Serving)
It is important to consider this information as approximate and not to use it as definitive health advice.
Allergy Information
Please check ingredients for potential allergens and consult a health professional if in doubt.