Mini Animal Cracker Cookies Fun & Easy Recipe
Mini Animal Cracker Cookies are about to become your new favorite sweet obsession! If you’re anything like me, the nostalgic crunch and faint sweetness of those beloved childhood animal crackers hold a special place in your heart. But what if I told you we could elevate that simple joy into something even more delightful? These mini animal cracker cookies take that familiar, comforting flavor and transform it into a tender, melt-in-your-mouth cookie that’s bursting with personality. They’re incredibly easy to whip up, making them the perfect project for a fun afternoon in the kitchen, whether you’re baking with kids or just indulging your inner child. What truly makes these mini animal cracker cookies so special is their charming appearance and the sheer delight they bring. Each bite is a tiny burst of happiness, a delicious reminder of simpler times, and a testament to how a classic can always be reinvented into something magical.
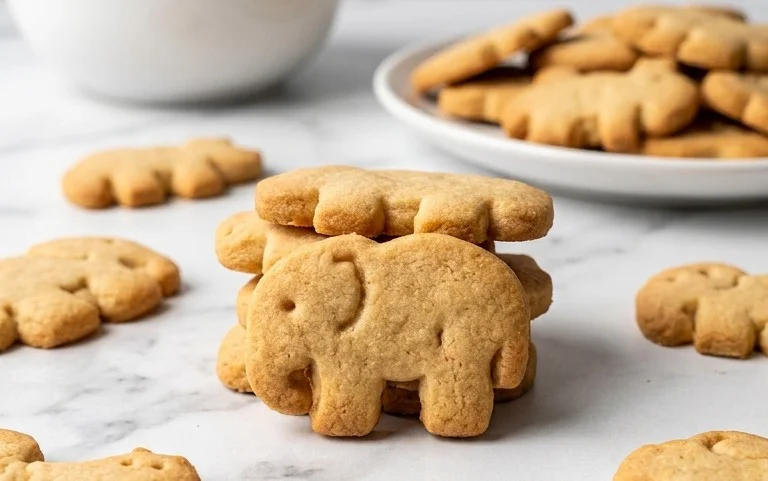
Mini Animal Cracker Cookies
Get ready for a blast of fun and flavor with these adorable Mini Animal Cracker Cookies! These aren’t your average store-bought crackers; we’re talking about homemade goodness, perfectly sized for little hands (and big hands who are young at heart!). Imagine a slightly crisp, subtly sweet cookie that you can decorate to look like your favorite zoo animals, circus stars, or even a whimsical menagerie of your own creation. These are perfect for birthday parties, classroom celebrations, or just a delightful afternoon treat. The best part? They’re surprisingly simple to make, and the decorating possibilities are endless, making them a fantastic activity for the whole family.
Ingredients:
- 2 and 1/4 cups (281g) all-purpose flour (spooned & leveled), plus more as needed for rolling and work surface
- 1 teaspoon ground cinnamon
- 1/2 teaspoon baking powder
- 1/4 teaspoon salt
- 3/4 cup (12 Tbsp; 170g) unsalted butter, softened to room temperature
- 3/4 cup (150g) granulated sugar
- 1 large egg, at room temperature
- 1 and 1/2 teaspoons pure vanilla extract
- Royal Icing or Easy Cookie Icing (store-bought or homemade)
- optional: food coloring*
- rainbow sprinkles
Instructions:
-
Prepare the Dough:
In a medium bowl, whisk together the all-purpose flour, ground cinnamon, baking powder, and salt. This dry ingredient mixture will form the base of our cookies, providing structure and a hint of warm spice. Ensure the cinnamon is evenly distributed for consistent flavor. Set this bowl aside. In a large bowl, using an electric mixer (or a sturdy whisk and some elbow grease), cream together the softened unsalted butter and granulated sugar until the mixture is light and fluffy. This creaming process incorporates air into the dough, which contributes to the cookie’s texture. The butter should be soft enough to easily indent with your finger, but not melted. Next, beat in the large egg and pure vanilla extract until well combined. The egg adds richness and helps bind the ingredients, while the vanilla extract provides that classic sweet aroma and taste. Gradually add the dry ingredients to the wet ingredients, mixing on low speed until just combined. Be careful not to overmix the dough at this stage, as it can lead to tough cookies. If the dough seems a little sticky, you can add a tablespoon of flour at a time until it’s manageable. Once the dough comes together, divide it in half, flatten each half into a disk, wrap them in plastic wrap, and refrigerate for at least 30 minutes. This chilling step is crucial as it allows the gluten to relax and the fats to firm up, making the dough easier to roll and cut without spreading too much during baking. -
Roll and Cut the Shapes:
Preheat your oven to 350°F (175°C). Line baking sheets with parchment paper. This prevents the cookies from sticking and makes for easy cleanup. Working with one disk of dough at a time, lightly flour your work surface and a rolling pin. Roll out the dough to about 1/4-inch thickness. It’s important to aim for an even thickness so the cookies bake uniformly. If the dough becomes too soft or sticky while you’re rolling, pop it back into the refrigerator for a few minutes. Now comes the fun part – using your mini animal cookie cutters! You’ll want cutters that are about 1 to 1.5 inches in size. Gently press the cutters into the dough and remove the shapes, transferring them to the prepared baking sheets, leaving about 1 inch of space between each cookie. Reroll the scraps of dough, being careful not to overwork them, and cut out more shapes until all the dough is used. The smaller the cookies, the shorter the baking time, so keep that in mind! -
Bake to Golden Perfection:
Place the baking sheets in the preheated oven. Bake for 8-10 minutes, or until the edges are lightly golden brown. The exact baking time will depend on your oven and the size of your cookies. Keep a close eye on them, especially during the last few minutes, as small cookies can go from perfectly baked to overdone very quickly. You want them to be firm to the touch and have a delicate golden hue around the edges. Avoid browning the centers too much. Once baked, remove the baking sheets from the oven and let the cookies cool on the sheets for about 5 minutes. This allows them to set up slightly before you move them. -
Cool and Decorate:
After the initial cooling period on the baking sheets, carefully transfer the cookies to a wire rack to cool completely. It’s essential that the cookies are entirely cool before you start decorating. Warm cookies will melt the icing and make a mess. While the cookies are cooling, prepare your royal icing or cookie icing. If you’re using store-bought icing, follow the package instructions. For royal icing, you’ll typically mix powdered sugar with meringue powder and a little water until it reaches a smooth, pipeable consistency. If you’re feeling ambitious and want to add some color, divide your icing into small bowls and stir in a tiny bit of food coloring to achieve your desired shades for animal fur, spots, stripes, or just bright, cheerful colors! -
Bring Your Animals to Life:
This is where your creativity can truly shine! Use piping bags with small tips, or even just a spoon or toothpick, to spread or pipe the icing onto the cooled cookies. You can create simple outlines, fill in the shapes, or get elaborate with details like eyes, ears, and noses. For a more traditional animal cracker look, a simple tan or golden icing can be applied and then decorated with darker brown dots or stripes. Don’t be afraid to experiment with different colors and patterns! Once the icing is applied, immediately sprinkle with rainbow sprinkles or add any other edible decorations you desire before the icing has a chance to set. Let the decorated cookies sit undisturbed until the icing is completely dry and hardened. This can take several hours, or even overnight depending on the humidity and the type of icing used. Once dry, your mini animal cracker cookies are ready to be enjoyed or shared! Store them in an airtight container at room temperature.

Conclusion:
These Mini Animal Cracker Cookies are an absolute delight! They’re wonderfully simple to make, making them perfect for a fun afternoon baking with kids or for a quick, charming treat. The combination of a buttery cookie base with the satisfying crunch of animal crackers is truly a winner. I love how versatile they are; you can easily customize them to suit any occasion or preference. I truly encourage you to give this recipe a try – I’m confident you’ll fall in love with these adorable and delicious bites. They’re fantastic for parties, lunchboxes, or just as a sweet pick-me-up. Enjoy baking and sharing these little joys!
Frequently Asked Questions:
Can I make these cookies ahead of time?
Absolutely! These Mini Animal Cracker Cookies store wonderfully in an airtight container at room temperature for up to 3-4 days, making them perfect for preparing in advance for events or to have a stash ready.
What are some other fun variations I can try?
There are so many! You can try adding a swirl of frosting to the cooled cookies, dipping half in melted chocolate (milk, dark, or white!), or even sprinkling them with colorful nonpareils before baking for an extra festive touch. For a seasonal twist, consider using themed animal crackers if available!
Mini Animal Cracker Cookies
These delightful mini animal cracker cookies are a fun and easy treat for any occasion. They’re perfect for decorating and a hit with kids and adults alike. Made with simple ingredients and customizable with colorful icing and sprinkles.
Ingredients
-
2 and 1/4 cups (281g) all-purpose flour, plus more as needed for rolling and work surface
-
1 teaspoon ground cinnamon
-
1/2 teaspoon baking powder
-
1/4 teaspoon salt
-
3/4 cup (12 Tbsp; 170g) unsalted butter, softened to room temperature
-
3/4 cup (150g) granulated sugar
-
1 large egg, at room temperature
-
1 and 1/2 teaspoons pure vanilla extract
-
Royal Icing or Easy Cookie Icing (optional)
-
food coloring (optional)
-
rainbow sprinkles (optional)
Instructions
-
Step 1
In a medium bowl, whisk together the all-purpose flour, ground cinnamon, baking powder, and salt. Set aside. -
Step 2
In a large bowl, cream together the softened unsalted butter and granulated sugar until light and fluffy. -
Step 3
Beat in the large egg and pure vanilla extract until well combined. -
Step 4
Gradually add the dry ingredients to the wet ingredients, mixing on low speed until just combined. The dough will be stiff. -
Step 5
Divide the dough in half, flatten each half into a disk, wrap in plastic wrap, and refrigerate for at least 1 hour. -
Step 6
Preheat your oven to 350°F (175°C). Line baking sheets with parchment paper. On a lightly floured surface, roll out one disk of dough to about 1/4-inch thickness. Use mini animal cracker cookie cutters to cut out shapes. Place cookies on the prepared baking sheets. -
Step 7
Bake for 8-10 minutes, or until the edges are lightly golden. Let the cookies cool on the baking sheets for a few minutes before transferring them to a wire rack to cool completely. -
Step 8
Once the cookies are completely cool, decorate with royal icing or easy cookie icing, food coloring (if using), and rainbow sprinkles as desired.
Important Information
Nutrition Facts (Per Serving)
It is important to consider this information as approximate and not to use it as definitive health advice.
Allergy Information
Please check ingredients for potential allergens and consult a health professional if in doubt.